By: Chad Lawie, Founder, WP Harbor
Updated February 10th, 2023
I understand you’re busy, so I’m going to get straight to the point. The following explains how to search engine optimize a WordPress blog post.
Writing Quality Check
Proofread
The blog post should be logical, well-written, and free of grammar or spelling errors. If the writing is not up to par it should be sent back to the writer for correction.
Plagiarism
The writing should be checked on SEM Rush for plagiarism and originality. If it is plagiarized, send it back to the writer to be rewritten.
Missing Content
If there are any additional sections that need to be added or additional questions that need to be answered, send it back to the writer.
Sources
Factual claims should be sourced with a hyperlink. Sources should be studies, news articles, government, and nonprofits. Avoid linking to private business, and never link to a competing business as a source.
Table of Contents
Each post should include a table of contents. If it does not, send it back to the writer. The TOC will be linked up when the post is published on the website.
Tables
Tables are great for SEO, particularly comparison tables. These can be created with an html table builder. If the post compares data, it should probably be summarized in a table.
Lists
Google loves lists. If the post contains lists of data in paragraph form, send it back to the writer and request the put the information in a list.
Add Media
Graphics (as needed)
Would the post benefit from a diagram or infographic? Example post.
3rd Party Video (as needed)
Can generic 3rd party videos be added? Example post.
Custom Video (as needed)
Create a video of the post being read aloud with a static image and the post read aloud, or a slideshow presentation video with no words.
Example 1, Example 2. Uploading a video to youtube or presentation SlideShare also offers the opportunity to create a backlink.
Create a Custom Featured Image
Each post requires a custom image/graphic. Creating a custom image gives Google something new, as opposed to simply posting a free stock photo that is already all over the internet. We want Google to see our image as unique, quality content.

The general process is to select a stock photo from a free resource (see below) and then add the post title and custom graphics using Canva or whatever graphics editing program you are most comfortable with.
- https://unsplash.com/ – Free stock photos
- https://www.pexels.com/ – Free stock photos
- https://www.canva.com/ – Free & easy-to-use graphics tool with templates
Optimize Images
Resize image
Resize image width x height to the display size on the website. If you upload an image that is 1920w X 1080h (full HD) but the image is displayed at a smaller size, say 640w x 360h, the full image is still loaded by the user. This slows down the page, negatively impacting SEO because page speed/performance is a ranking factor. For this reason, make sure any images in the post are sized to the dimensions the image will be displayed at.
Compress the image
Compress the image using Kraken.io. This compresses the image without sacrificing quality and also removes hidden metadata. Like above, the purpose of this step is to reduce the file size of the image to make load time as fast as possible because page speed/performance is a ranking factor!
Rename image filename
Rename image filename to use a variation of the post title or a target keyword or phrase. For example “brain-surgeon-in-chicago.jpg”. Don’t overthink it either because it won’t have a huge impact, but it’s better than something like “image_4903z5.jpg”.
Add an image alt tag
Add an image alt tag. It can be the same as the file name or different but it should also be keyword-oriented.
Optimize Title & Headings
Review the post title and subheadings and look for ways they could be improved:
Keyword Opportunities
Look for opportunities to add natural search terms or phrases.
Engagement
Consider using a headline analyzer and re-writing the title and headlines to be more engaging (but not spammy).
Accurate
Make sure the Title & Headings are accurate.
Optimize Internal & External Links
Internal Linking
If the post doesn’t have an internal link, consider adding one. For example, if I were writing a post about WordPress hosting services, I might link that search phase to the home page or dedicated service page of that site.
All sites that we provide SEO services for have a Site Map that can be found in the footer. This is a handy way to figure out which pages/posts you have available to link to.
External Linking
If the post doesn’t have an external link, consider adding one. For example, if I were to say over 40% of all websites use WordPress, I would want to link to a credible 3rd party source that is a study, news article, or nonprofit. Not a competitor.
Optimizing on WordPress
Select a post category
Select a post relevant category(ies).
Optimize Permalink
Insert the target keyword into the post URL.
Optimize Yoast Settings
– Check the Search Preview
– Set the post title
– Write a meta description
– Check the Social Preview using Facebook’s debugging tool
– Set the post title
– Write a post description
– Add a post image
Publish Blog Post
Publish the post, then read through the live post checking for any errors.
Post to Google My Business
Go to Google My Business.
Post an update that promotes the blog post using the following guidelines:
Stick with 80-100 words per Post. (Even though you’re allowed to write up to 300 words, depending on the device, it won’t all be visible). Follow SEO best practices, make sure to put keywords and the most important message towards the front of the paragraph of your Post.
The best image size for your Google Post is 750 x 750 and the image should be centered so that it will still look good if it gets cropped. Don’t upload an image that’s smaller than 250 x 250 — it won’t be accepted. Be sure to preview the post before publishing. If you are not happy with the way your image looks, try uploading a 400 x 300 image.
If your image has text on it, keep in mind that the text may get cut off on mobile devices. When possible it’s best to just stick with an image with no text on it.
Remember, a Post is your opportunity to talk directly to your customers, so speak semantically and use a “real-world” conversational tone in your copy.
Make sure the landing page you send visitors to matches the content of the Post and meets a visitor’s expectations.
Recommended reading: How to Create Google Posts That Will Win You More Customers from Bright Local
Indexing through Search Console
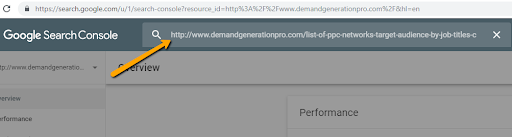
Step 1: Use ‘Inspect Any URL in…’ search bar that you can find on the top of every page of your GSC account. Type the URL and then hit submit. Wait for Google to retrieve the information about your page. Normally it takes from a few seconds to 2 minutes to get the result.
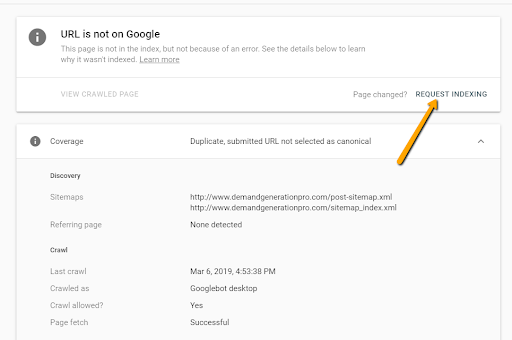
Step 2: Click “Request Indexing”
Once Google retrieves information about the page you’ll get a full report that includes: if the page is already indexed or not, last crawl date, crawled version, sitemap coverage, history, mobile version, and issues with the page Google might find.
If the page is not indexed or indexed as an older version, use the ‘Request Indexing’ button located on the right of the report.
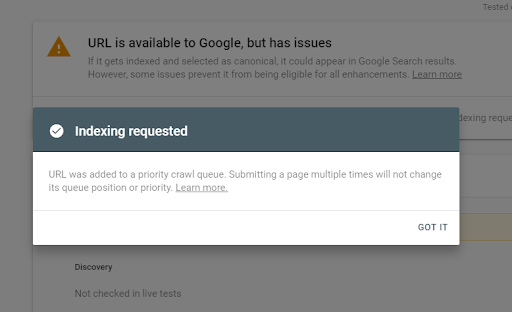
Step 3. Wait for Google to crawl and index/reindex your page.
After submitting the URL to crawl, it takes anywhere from 10 seconds to 10 minutes for a page to be indexed or reindexed and updated in the search results. Clear your cache or use the ‘incognito’ browser mode to view the live search results.
The search position can improve or decline significantly if the new version of your page has a lot of changes or replaces old content.
Chad lawie
Founder, WP Harbor
800-407-1114
[email protected]
800 E. Ellis Road, Suite 576
Muskegon, MI 49441